Post note: After using this system for about a month now, we realised we hadn't added a lint catcher of filter, so have stretched a piece of flywire across the top, held on with the lid. Simon also drilled out the small filter on the tap itself, which allows for greater flow-through of water.
Canberra is switching to stage 4 water restrictions sometime in July/August, which means NO outdoor watering (i.e. using potable water). ActewAGL also have a waste water treatment program to help manage our decreasing potable water levels.
We love our garden, like many other Canberrans, and while we generally use our washing (grey) water, sometimes when we wash we don't need to water the garden then and there (particularly now in the winter months). According to ACT Health, an average household can generate up to 528 litres of grey water everyday - crikey! Makes you want to reuse it, just to make it really worth it! :o) So, reusing our washing water (approx 120 litres a wash) is a pretty good start!
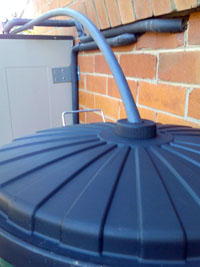
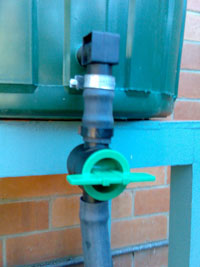
So today, we put together a cheap grey water system, made up of a 75 litre garbage bin (we have a small-ish washer), with a clip-on lid, outlet, garden tap and 13mm hose. We didn't want to spend up big on a complete system (being fairly recent home owners and all!), and wanted something that could collect washing water, yet allow us to water at another time as the garden needed it. We have an existing hose running from the machine out to the garden which we move about to soak plants.
The system goes together like this:
1. The hose runs from the washing machine outlet hose to the top of the "tank" (75 litre garbage bin).
2. A hole in the top (i.e. bin lid) allows any air to escape as the "tank" fills. The hose is set at top of the "tank", to avoid any siphon-effect, so that water does not get sucked back into the machine.
3. An outlet with a tap is fitted at the base of the "tank", to allow water to be used (via a gravity-feed method) when required. This will hopefully take the pressure of the washing machine pump too (fingers crossed).
**Note: ACT Health guidelines on using grey water strongly recommend you dispose of unused grey water after 24 hours via your sewage system - you need approval to store grey water any longer than 24 hours (it's a good read actually, states how to set up and manage your grey water use and explains the affects possible of grey water on your garden too).
We have set the system up just above our sewage drain outlet and can run unused water directly into the sewage system when necessary.
4. To use the grey water, we can either attach a hose that runs out into the garden, or use a watering can, depending on what requires a little watery lovin'! The good thing is that the system is pretty much a closed one, making it relatively safe (in terms of storing it at least).
Here's a quick slideshow of the parts that came together to make our cheap grey water system.
When I say the system is "cheap", the whole lot cost less than $A40. We had existing hose (about 15 metres or so) and used some silicon to seal the outlet at the base of the bin. All parts were found from our local hardware store too. It took less than an hour to set up the system itself and we will allow 48 hours for the silicon to set (especially so it doesn't contaminate the water and thus our lovely vegies and plants!). We could get a bigger bin, but given the time limit on storing grey water, it's likely 75 litres would suffice.
Eventually, we would love to have a fully integrated grey water system, where we could reuse the water for flushing toilets, as well as for watering the garden. This, combined with a rain water tank, would really reduce our water usage!
We'd love to hear how you're coping with water shortages and restrictions - what projects have you done to conserve water in your home? What do you think of our "cheap" grey water system?
Sunday, 24 June 2007
Setting up a grey water system on the cheap
Posted by
Marg
at
Sunday, June 24, 2007
2
comments
![]()
Labels: ActewAGL, ACThealth, drought, garden_beds, grey_water, projects, water_restrictions, watering
Monday, 18 June 2007
Mint as companion plant to cauliflower and broccoli
I did a quick run around the garden a couple of weeks ago to see how our vege patches were going and they are holding up well so far this winter (fingers crossed!).
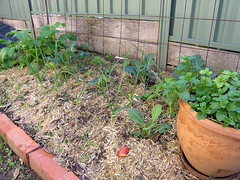
This pic shows our companions plants "in action", with spuds at the left side (end of the bed) with some garlic to the front of the bed, some broccoli and in the pot, some mint (a good companion for things like broccoli and caulies especially). Having mint in a pot also helps keep it under control especially in a small garden/yard like ours!
Jackie French (well known gardener and companion plant advocate) says that "The main reason for using companion planting with your brassicas is to disguise them so aphids and caterpillar producing butterflies won't find them." Jackie also suggests that planting tomatoes and brassicas together also helps mask each other's smell. I reckon Jackie would probably tell us to add more companions to this example!
Another good companion is flowering clover (and other flowering weeds), which can stop an infestation of aphids should you have such a problem. At the moment in Canberra, it seems insects don't like the cold, as we've really only been hit by a few caterpillars. Those brassicas closest to the mint pot haven't been affected though - it works! :o)
Sally Morton at Suite101 has a good article on using herbs for companion planting too. It's a good guide for getting started, if you're keen to try companion planting.
Check out more pics on our companion plants and other projects.
Wednesday, 13 June 2007
Orchard trees for her birthday
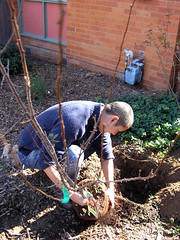
 Happy birthday me! I celebrated (rather than denied) my age with a kick-ass jungle party, and Simon bought me a plum and olive tree! What more could a 30-something gal ask for?!
The plum is a Japanese Santa Rosa and the olive is a Manzanillo, a popular Spanish variety.
P.S. Simon then bought another plum, having realised that we needed a second one for pollination. This one is a Japanese Mariposa which can cross-pollinate with the Santa Rosa.

Subscribe to:
Comments (Atom)


